

布局是一个App非常关键的一部分,布局性能的好坏可直接影响到用户的体验。试想下如果一个RecyclerView滑动时异常卡顿,那用户估计也没有心情去住下滑了,可能就直接强制杀掉App了去,然后回过头去应用商店给个差评“卡的不要不要的”。虽然现在手机内存、CPU等各项性能都上来了看起来很强,实际上还是卡的不行,所以我们还是要多学习下性能优化方面的知识。
本文将分三个部分来介绍Android布局优化的相关知识:
- 优化布局层级
- 布局重用
- 按需加载布局
优化布局层级
优化布局的层级是非常重要,大家都知道Android的布局元素主可分为View和ViewGroup,其他LinearLayout、FrameLayout都是ViewGroup的子类。每个View在显示之前都会有测量(measure)、布局(layout)、绘制(draw)这三步,布局层次越深相应的带来的层级遍历的消耗就越多。要优化布局的层级可以使用Layout Inspector来分析某个View的测量、布局、绘制所消耗的时间,帮助开发时定位布局性能较差的点。
使用Layout Inspector非常方便,只需要简单的几步就能使用:
- 在连接的设备或模拟器上运行您的应用
- 点击 Tools > Android > Layout Inspector。
- 在出现的 Choose Process 对话框中,选择您想要检查的应用进程,然后点击 OK。
- 选择需要分析的Activity页面
- 选择
Layout Inspector分析完成就可以查看各项数据了。
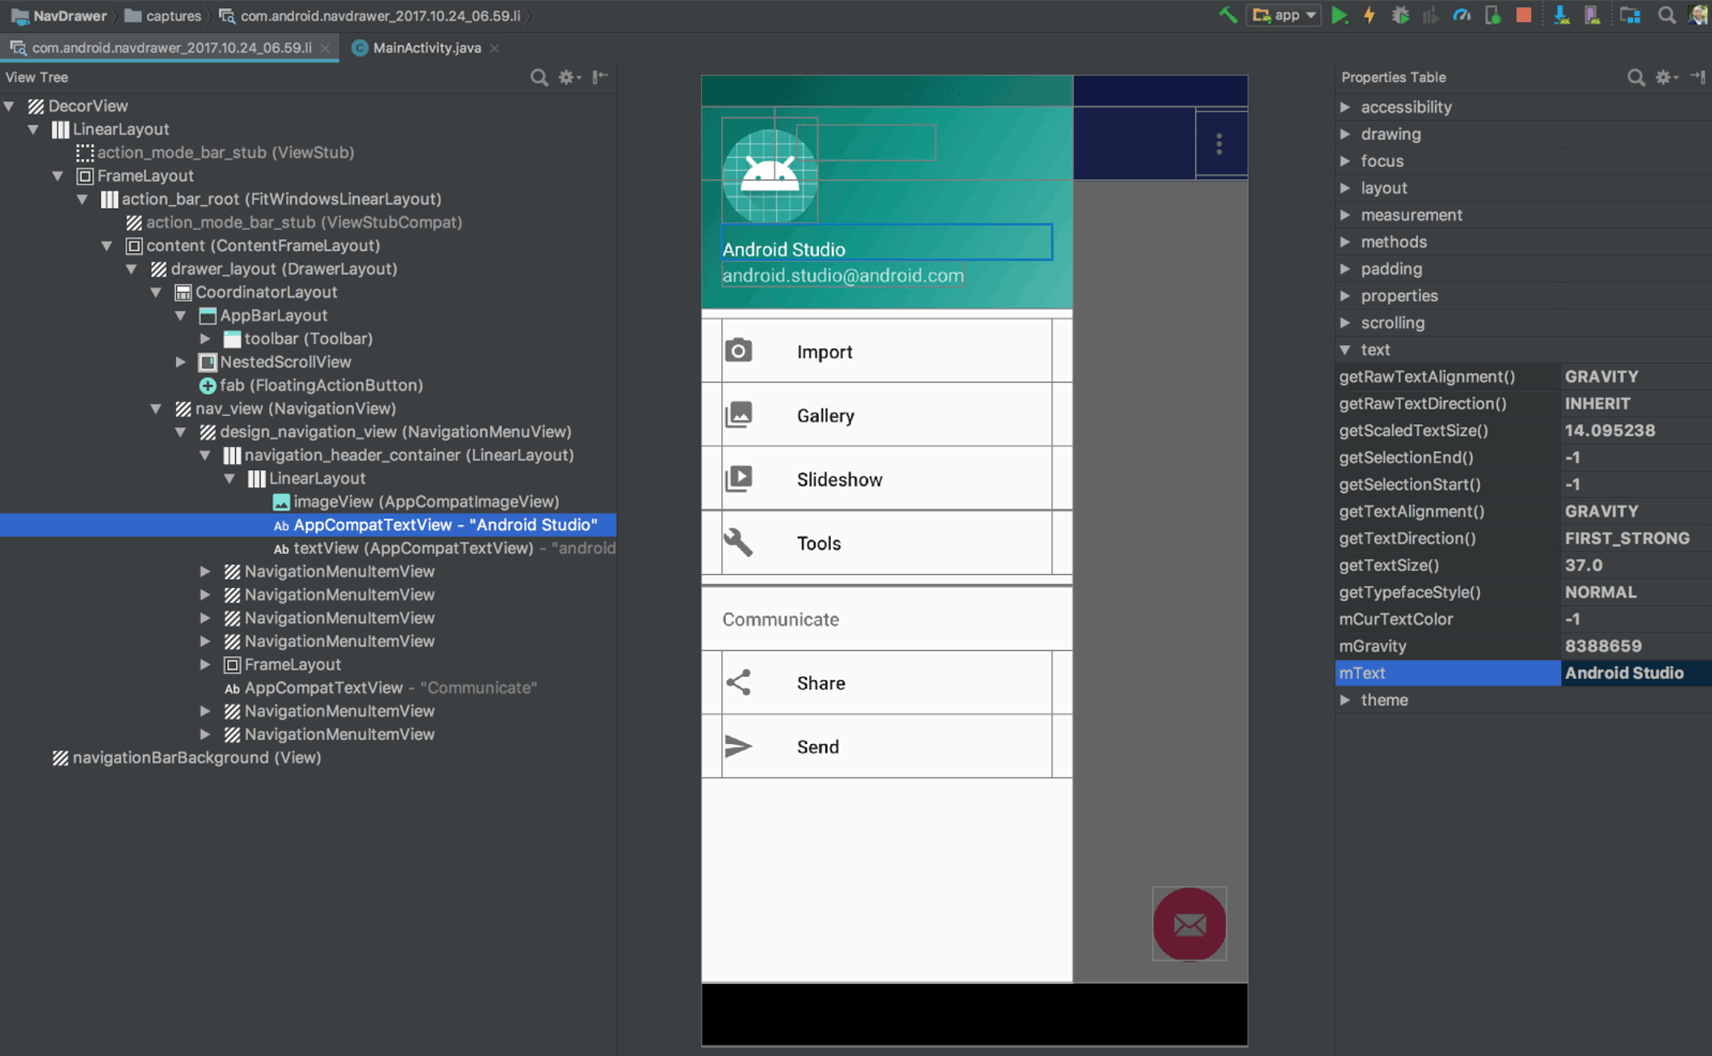
如下图所示Layout Inspector的主界面可分为三个部分:
- View Tree:视图在布局中的层次结构。
- Screenshot:带每个视图可视边界的设备屏幕截图。
- Properties Table:选定视图的布局属性。
使用Layout Inspector分析布局层次后就可以对布局的层次做一些改动,以下是一些小技巧大家可参考优化布局层级:
- 使用 ConstraintLayout
- 使用
merge标签 - 使用
compound drawable
布局重用
布局重用是开发过程中非常重要的一部分,这样能减少多余的布局文件和维护成品。在Android中布局重用可以使用<include>标签,它可以高效重用完整的布局,比如有多个Activity中都有一个底部的Button除了文字不同以外其余的样式都基本相同,这样只需要建立一个底部按钮布局文件,然后在Activity的布局中通过<include>标签引用按钮的布局就可以实现一个统一按钮。
根据上面提到的例子新建一个layout_bottom_button.xml的布局文件:
<?xml version="1.0" encoding="utf-8"?>
<FrameLayout xmlns:android="http://schemas.android.com/apk/res/android"
    android:layout_width="match_parent"
    android:layout_height="wrap_content"
    xmlns:tools="http://schemas.android.com/tools"
    android:background="@android:color/white"```
    <include
    layout="@layout/layout_bottom_button"
    android:layout_width="match_parent"
    android:layout_height="match_parent"

    />

    >

    <Button
        android:layout_width="match_parent"
        android:layout_height="50dp"
        android:layout_margin="5dp"
        android:background="#36b7f7"
        android:textColor="@android:color/white"
        tools:text="下一步"
        />
</FrameLayout>
然后再建立一个新的布局文件,使用<include>标签包含上面的布局:
<?xml version="1.0" encoding="utf-8"?>
<FrameLayout xmlns:android="http://schemas.android.com/apk/res/android"
android:layout_width="match_parent" android:layout_height="match_parent">

<include layout="@layout/layout_bottom_button"/>

</FrameLayout>
只需要简单几步就能实现布局的重用,同时还可以重新覆盖布局参数:
<include
    layout="@layout/layout_bottom_button"
    android:layout_width="match_parent"
    android:layout_height="match_parent"

    />
需要注意的是,覆盖布局参数时必需要覆盖layout_width和layout_height这两个参数。
按需加载布局
有些时候布局会需要一些其它的View,但它们不是一开始就显示到界面上,比如进度条、提示消息等元素,它们只会在特点的场景下才会出现,类似这样的场景可以使用<ViewStub>标签来处理在需要的时候加载View。
ViewStub是一个轻量级的View,它不会显示到界面上,它只会在你需要的时候加载将布局加载到布局层次中。ViewStub的使用非常简单只需要一个android:layout属性来指定需要替换的布局文件就可以了:
<ViewStub
   android:id="@+id/stub_import"
   android:inflatedId="@+id/panel_import"
   android:layout="@layout/progress_overlay"
   android:layout_width="fill_parent"
   android:layout_height="wrap_content"
   android:layout_gravity="bottom" />
当你需要加载android:layout指定的布局文件时,只需要调用setVisibility(View.VISIBLE)或inflate()方法就能将ViewStub替换成android:layout指定的布局:
findViewById(R.id.stub_import).setVisibility(View.VISIBLE);
// or
View importPanel = ((ViewStub) findViewById(R.id.stub_import)).inflate();
用setVisibility(View.VISIBLE)或inflate()方法后,ViewStub将不再是布局层次中的一部分,它会被android:layout指定的布局文件替换掉。
