

环境
SpringCloud:Finchley.RELEASE
SpringBoot:2.0.0.RELEASE
JDK:1.8
1. Spring Cloud Config
1.1. 配置中心概述
对于传统的单体应用,常常使用配置文件来管理所有配置,比如spring boot的application.yml,但是在微服务中如果使用手动维护所有的配置文件的话很麻烦而且不易维护。因此微服务的配置管理一般有如下要求:
- 集中管理配置
- 不同环境不同配置
- 运行期间可动态调整
- 配置修改后可自动更新
1.2 常见的配置中心
- Spring Cloud Config
- Apollo(阿波罗),是携程开发的配置中心
- Disconf,由百度开发的配置中心
1.3 Spring Cloud Config简介
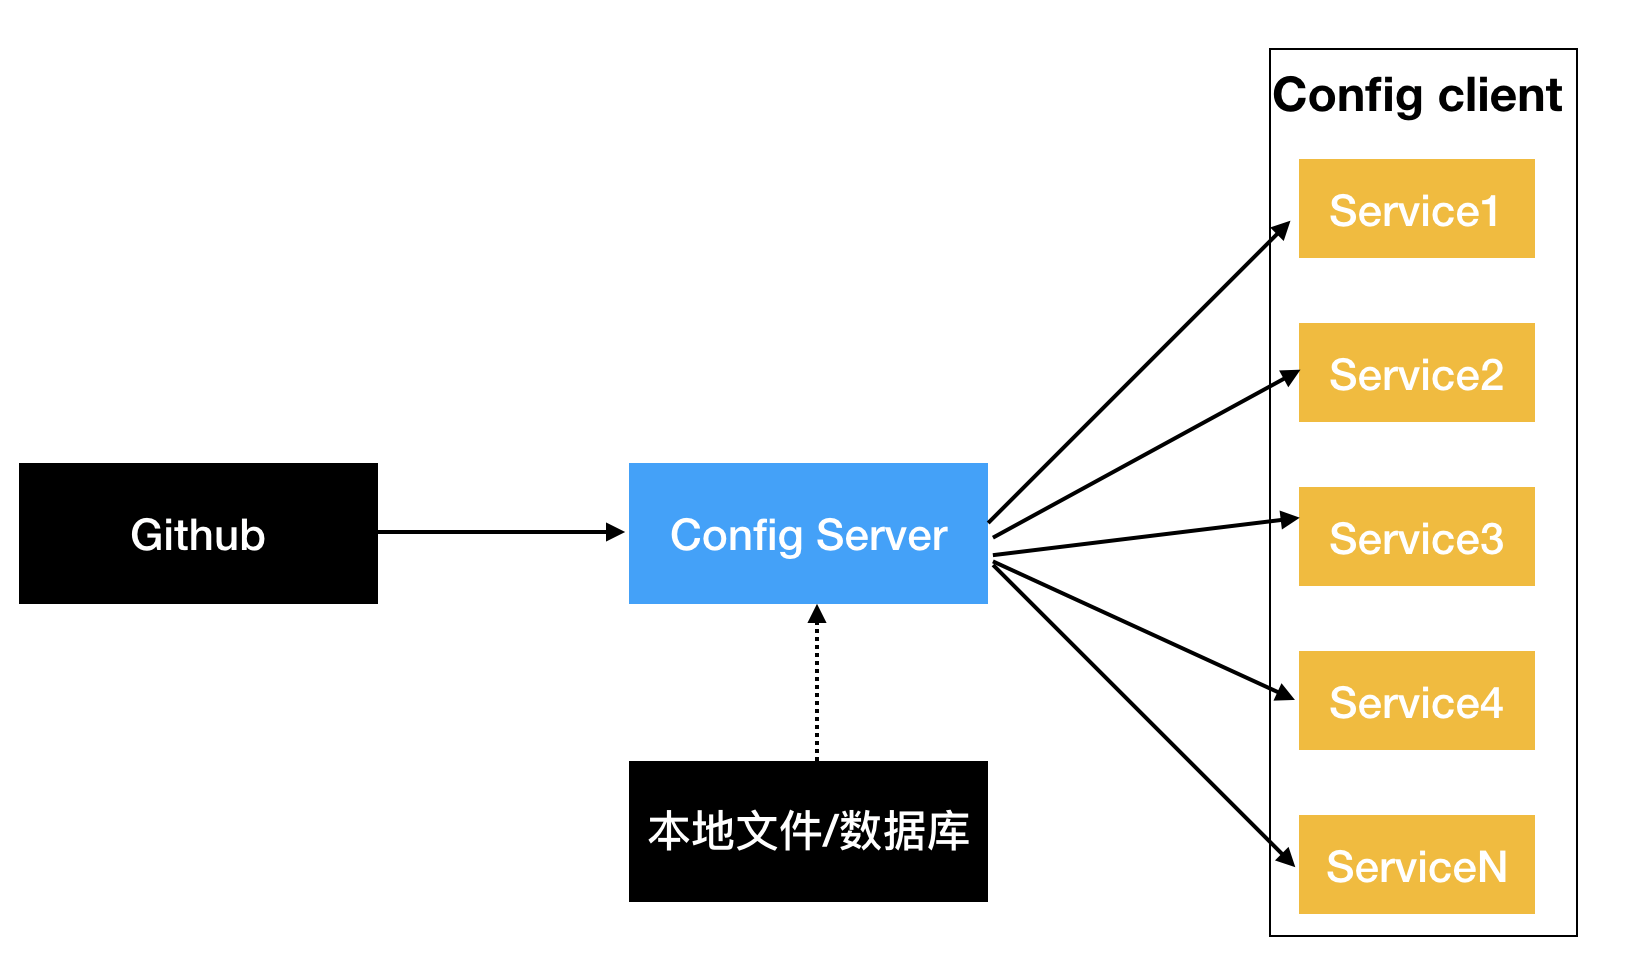
Spring Cloud Config是一个解决分布式系统的配置管理方案,包含Server和Client端,Server端提供配置文件的存储、以接口形式将配置文件的内容提供出去,Client通过接口获取数据,并将此数据初始化自己的应用。
2. 入门案例
2.1 Config Server
-
在github中创建配置文件
application-dev.yml,配置服务器默认采用git来配置存储信息,方便版本管理。也可以使用本地文件系统来存储。spring: profiles: active: - dev --- server: port: 8888 spring: profiles: dev application: name: microserviceconfig-dev my: desc: desc-dev --- server: port: 9999 spring: profiles: test application: name: microserviceconfig-test my: desc: desc-test重点说明:在配置文件中,不允许在系统自带的标签下面自定义标签,如:
spring.application.desc,但可以从顶级目录开始自定义标签,如:my.desc -
配置application.yml
server: port: 5001 spring: application: name: microserver-config cloud: config: server: git: uri: https://github.com/buyimoutianxia/microservicerconfig.git -
pom中增加对ConfigServer的依赖
<dependencies> <!--SpringCloud 配置中心--> <dependency> <groupId>org.springframework.cloud</groupId> <artifactId>spring-cloud-config-server</artifactId> </dependency> <!--热启动--> <dependency> <groupId>org.springframework.boot</groupId> <artifactId>spring-boot-devtools</artifactId> <optional>true</optional> </dependency> </dependencies> -
启动类开启对配置中心的支持注解@EnableConfigServer
@SpringBootApplication @EnableConfigServer public class ConfigServer5001 { public static void main(String[] args) { SpringApplication.run(ConfigServer5001.class, args); } } -
启动服务,访问路径获取配置信息
http://localhost:5001/application-dev.yml或者http://localhost:5001/application/dev访问方式如下:
| 序号 | 访问路径 |
|---|---|
| 1 | /{application}/{profile}[/{label}] |
| 2 | /{application}-{profile}.yml |
| 3 | /{label}/{application}-{profile}.yml |
| 4 | /{application}-{profile}.properties |
| 5 | /{label}/{application}-{profile}.properties |
Spring Cloud Config也支持本地存储配置的方式。我们只需要设置属性 {spring.profiles.active=native},Config Server会默认从应用的{src/main/resource}目录下检索配置文件。 也可以通过{spring.cloud.config.server.native.searchLocations=file:F:/properties/}属性来指定本地文件的位置。 虽然Spring Cloud Config提供了这样的功能,但是为了支持更好的管理内容和版本控制的功能,还是推荐使用git的方式。
2.2 Config Client
-
新建 module ConfigClient
-
pom中增加对配置中心client端的jar支持
<dependencies> <!--SpringCloud Config 客户端--> <dependency> <groupId>org.springframework.cloud</groupId> <artifactId>spring-cloud-starter-config</artifactId> </dependency> <dependency> <groupId>org.springframework.boot</groupId> <artifactId>spring-boot-starter-web</artifactId> </dependency> <dependency> <groupId>org.springframework.boot</groupId> <artifactId>spring-boot-devtools</artifactId> <optional>true</optional> </dependency> </dependencies> -
新建bootstrap.yml(bootstrap.yml 系统级的配置文件,优先级高; application.yml 是用户级别的配置文件)
spring: cloud: config: name: application #从github上获取的资源名称,没有yml后缀 profile: test #访问的配置项 label: master #访问的分支 uri: http://localhost:5001 #SpringCloud Config Server端的地址 -
创建rest访问类
com.xyz.configclient.controller.ClientController@RestController public class ClientController { @Value("${server.port}") private int port; @Value("${spring.application.name}") private String name; // @Value("${spring.application.desc}") // private String desc; @RequestMapping("/config/client") public String rest() { return "port:" + port + " ,name:" + name ; } } -
启动类
@SpringBootApplication public class ConfigClient5002 { public static void main(String[] args) { SpringApplication.run(ConfigClient5002.class, args); } } -
dev访问路径:
http://localhost:8888/config/clienttest访问路径:http://localhost:9999/config/client
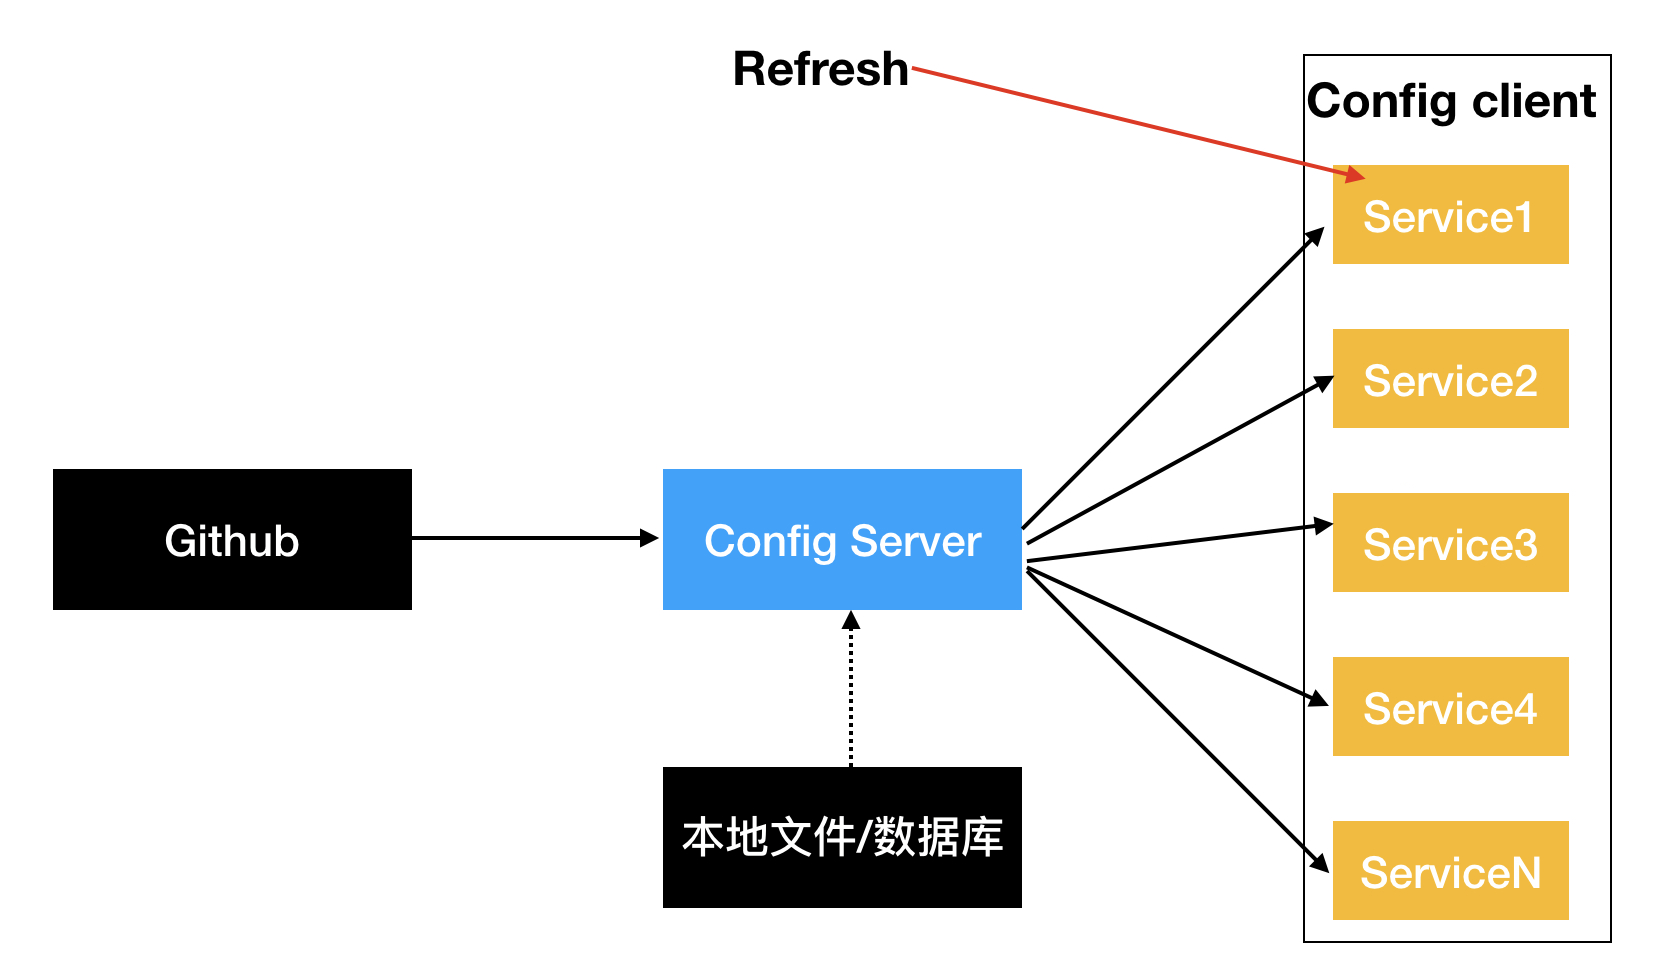
2.3 手动刷新
通过在Config Client端发起手工刷新操作,能够实现对节点的配置文件刷新
- 在config client端引入依赖
      <!--实现手动刷新-->
        <dependency>
            <groupId>org.springframework.boot</groupId>
            <artifactId>spring-boot-starter-actuator</artifactId>
        </dependency>
-
在需要刷新的程序中开启刷新注解
@RestController @RefreshScope public class ClientController { @Value("${server.port}") private int port; @Value("${spring.application.name}") private String name; @Value("${my.desc}") private String desc; @RequestMapping("/config/client") public String rest() { return "port:" + port + " ,name:" + name + " ,desc:" + desc; } } -
配置文件中actuator暴露刷新点
#开启actuator的refresh点 management: endpoint: endpoints: web: exposure: include: refresh -
通过发送
post请求http://localhost:9999/actuator/refresh实现手动刷新配置获取
